How To Cover A Lampshade With Fabric

Warning - the following information may cause you to frantically start covering all your lampshades in fabric.
A lovely friend is expecting her second child (any day now!)* and had been fruitlessly scouring the tinternet for a lampshade for the forthcoming arrival's giraffe-themed nursery. Fortunately, covering a lampshade in fabric is super-easy to do, so a couple of weekends ago we exchanged lampshade coverage for deli food and chocolate cake, while the Daddies refereed an increasingly hilarious stream of toddler negotiations.
Here's how to do it.
We loosely followed these instructions from House to Home, and used a can of this Stikatak Superspray Adhesive (fabric spray glue). You'll also need a pair of very sharp fabric scissors (that are strictly only used for cutting fabric! Not for trimming the dog's eyebrows or cutting shapes for your toddler to glue, OK?).

The first job was to measure and cut the fabric. The piece of fabric we had wasn't quite wide enough to create a hem at top and bottom, so we grabbed a few pieces of contrasting fabric with a view to creating a separate hem.
Due to the pattern and size of the piece of fabric, we decided to cut two pieces of fabric and create two vertical seams (obviously if your fabric is long enough, you can have just one seam). After a bit of trial folding, we decided that each piece of fabric should have one hidden edge and one visible folded seam, rather than first of all gluing on one piece of fabric, and then gluing the second piece of fabric (with a folded seam at each end) over the top. We creating nice, crisp seams by ironing them into place. I created the seams by eye, but of course you can also bust out the tape measure if you have chosen the two-seam option, and want them to be exactly opposite.

Next up, we did a quick test with the spray adhesive to decide whether to spray both the lampshade and the fabric, or just the fabric - and also to see how the fabric looked when dry. If you've never used a spray adhesive before I'd also suggest having a trial run with a spare piece of fabric just to get the hang of how the glue sprays out - ours sprayed in weird horizontal lines due to the shape of the nozzle, meaning the technique required to cover the fabric in glue was quite different to using a normal can of spray paint.
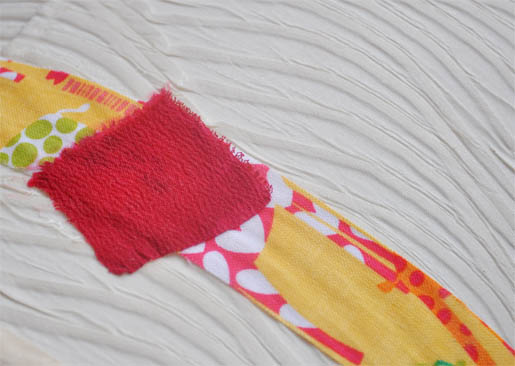
Having established that spraying both lampshade and fabric created the strongest bond, we ripped off the test fabric before it dried fully, and got cracking with the spray glue. First we sprayed the lampshade. Then we sprayed the first piece of fabric and stuck it in place, making sure the vertical seam lined up with the lampshade's existing seam. Finally we sprayed and stuck the second piece of fabric.
Things to note:
Fabric spray gets EVERYWHERE. It's the kind of job you'll want to do outside, lying each item to be sprayed on top of a clean towel for protection. I wouldn't recommend using newspaper in case the ink soaked into the wet gluey fabric, or in case the fabric stuck to the paper. Cardboard might work - but old bath towels worked well for us. You'll also need to wash your hands inbetween spraying each item.
Also - wet fabric becomes stretchy, and is a bit tricky to apply evenly. One piece of fabric started out with a 5mm hem at top and bottom, and ended up with 1mm at the top and 9mm at the bottom. So if you want to fold your fabric over the top and base of the lampshade, probably a 20mm hem at top and bottom would be ideal (which you'd then most likely need to trim straight). It would also therefore be more difficult to use a geometric piece of fabric as it would be more obvious if the pattern wasn't quite straight.
We abandonded the idea of creating a horizontal hem from a separate piece of fabric when I realised that trimming the edge with my super-sharp fabric scissors worked just fine. There was no fraying because the glue had caused all the threads in the fabric to stick together beautifully. Sweet! I'm not sure if this would work for a table lamp that could get knocked, but for a ceiling lamp it worked perfectly.

I said this was super-easy, and I've made it sound really complex, haven't I. Let me have another go.
- Measure, fold, iron and cut fabric.
- Stop to eat cake.
- Spray glue onto lampshade.
- Wash hands.
- Spray and stick fabric to lampshade.
- Wash hands.
- Stop to assure toddler that sharing her plastic PlayDoh cutter is not the end of the world as she knows it.
- Trim top and bottom with fabric scissors.
- The instructions from House to Home say to coat with fire retardant spray as a final step but we didn't have any so will complete this at a later stage.
Ta da!

And again - ta da!

Isn't it cute? Now I know how simple it is to do, I'm planning on covering a whole bunch of our plain existing lampshades. First up though: sanding the skirting boards in Natalia's room with my new Dewalt detail sander. Whassup!
*Baby girl arrived this morning! Congratulations to all involved xx