A Very, Very Long Victorian House Renovation To Do List

Thank you all so much for reading and commenting on last week's rainbow cake post. It's good to know that I'm not the only one getting slightly bored of page after page of perfect homes, crafts, cakes and DIY projects. I've always liked to keep things authentic, sharing pictures of everything from the messy party aftermath in our playroom and the giant mud-hole in our back garden to readily confessing that our master bedroom IS STILL BURGUNDY AND MUSTARD EVEN THOUGH WE MOVED IN 20 MONTHS AGO WHICH IS REALLY QUITE EMBARRASSING. So I'm going to keep right on sharing the story of our real-life family-home renovation, regardless of how pretty (or not!) things are round here.
So, have you seen Daniel Kanter's kitchen? I found his blog quite recently and have been happily following his kitchen progress posts. And the big reveal was just... wow. Really amazing. Kudos to the man for his vision and freaking hard work.

But yikes - this is just a temporary kitchen? Surely this is many people's idea of a permament, dream kitchen in their forever home?! And recently I've also seen more than a few posts on GOMI from people slating poor John and Sherry for not having immediately painted their salmon-pink living room the day they moved in. And then of course I started questioning whether we were disgracefully lazy for not having done more to improve our teeny tiny kitchen in the short-term while we save up for our brand new dream kitchen-diner (which will be located on the other side of the house when the extension is built).
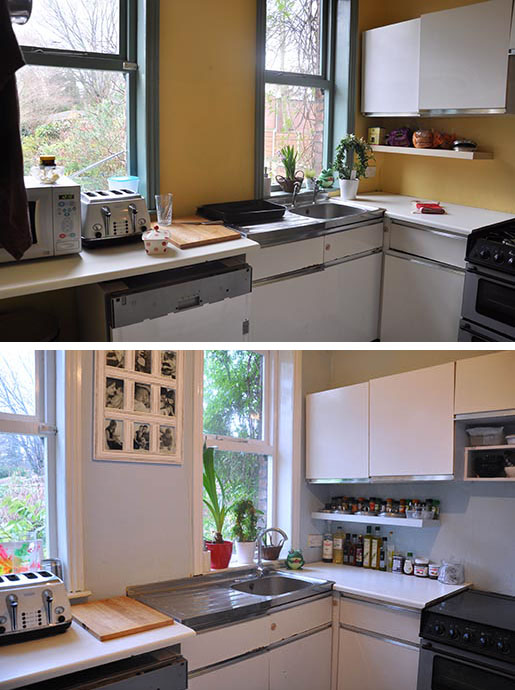
But then I scrolled down to Daniel's costings and realised he'd spent well over $1000 dollars on a cosmetic makeover - and with DIY supplies not being exactly cheap over here in the UK, I reckon it would probably cost about £1000 if we'd done the same. And there is just no way (now we've got children, anyway) that we could justify spending that much money on paint, plaster, wood, tile and flooring to improve a room on a temporary basis, not when we also have A MASTER BEDROOM WHICH IS STILL BURGUNDY AND MUSTARD EVEN THOUGH WE MOVED IN 20 MONTHS AGO - you get the picture.
And from having read all his (hilarious) posts recounting the kitchen renovation, I know that it took hours and hours and hours of work - which (again, with two children) is time that we just don't have. Daniel's probably spent more time on the kitchen than we've spent renovating our house in total since we moved in - such is renovation with small children in tow, and of course we wouldn't have it any other way.
Anyway, today I'd like to share our Autumn To Do List, in order to give a feel for the kind of tasks that need to be undertaken when you're renovating a Victorian house. It's not all room makeovers and bringing original features back to glorious life (although we've done a few of those, too) - it's more like a load of really tedious activities to accomplish basic objectives like, you know, not paying an eye-watering gas bill over the winter. So here's what we're going to be working on over the next few months.
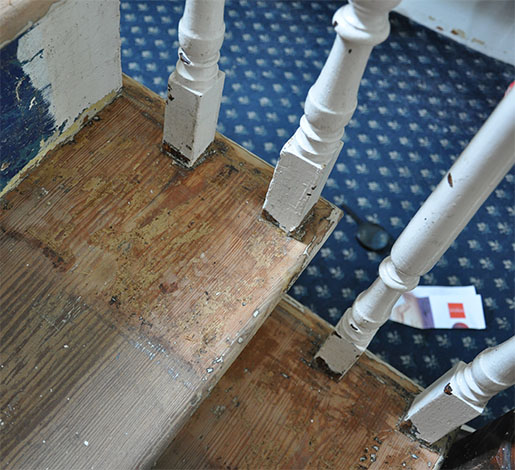
Stairs, hallway and landings
- Finish scraping lead from lower stairs
- Sand bottom stairs
- Oil bottom stairs
- Sand lower stair skirting boards
- Paint lower stair skirting boards
- Paint lower spindles
- Sand bannister and newel post
- Oil bannister and newel post.
Heating and insulation
- Talk to Worcester Bosch about thermal store options
- Buy thermal store
- Fit thermal store (or have it fitted)
- Research insulation for cellar roof
- Buy insulation
- Clear cellar room under living room
- Remove plaster and lath ceiling in room under living room
- Install cellar insulation in room under living room
- Do floor plans for master bedroom and decide where the en suite, dressing area and floor-to-ceiling storage will go
- Decide where to install radiator in master bedroom
- Buy new radiators
- Install radiator in master bedroom
- Install radiator in Eva's bedroom
- Move electric heater to Natalia room and test to ensure it's effective
- Take up floorboards in Natalia bedroom and install heater
- Work out what model boiler we have
- Buy suitable timer for boiler (it currently has two settings - on or off, meaning either we pay to heat a giant hot water tank even though we only need hot water twice a day, or we have cold water)
- Install timer for boiler
- Fix gap in Natalia's bedroom window
- Fix gap in spare room bedroom window
- Fit window film in Eva's bedroom to form secondary glazing - we still have the original Victorian windows and can't afford at this stage to replace them with new double glazing, so we're using thermal insulating window film as a good stop-gap measure
- Fit window film to spare bedroom
- Fit window film to Natalia's bedroom
- Use Home Strip to remove paint from master bedroom window in order to open one more window (currently all but one are painted shut, which is good for eliminating draughts but less effective for enabling fresh air to enter the premises)
- Prime and paint master bedroom window
- Fit window film to master bedroom.

Furniture projects
- Move wardrobe upstairs to living room (we bought a lovely wardrobe for Natalia on eBay about ten months ago, and it's been languishing in the cellar ever since)
- Buy Annie Sloan paint
- Assemble wardrobe (it's currently in pieces)
- Fix the back of the wardrobe (it cracked in transit, but it's cheapo plywood so we need to replace it with proper wood)
- Paint wardrobe
- Restore and reupholster wooden chair currently in playroom
- Restore second chair currently in playroom
- Strip paint from window frame art for spare bedroom (I liberated a couple of big Victorian window frames from a neighbour's skip, and plan to use them as giant photo frames)
- Strip paint from window frame art for Natalia bedroom
- Make tree hooks for spare bedroom.
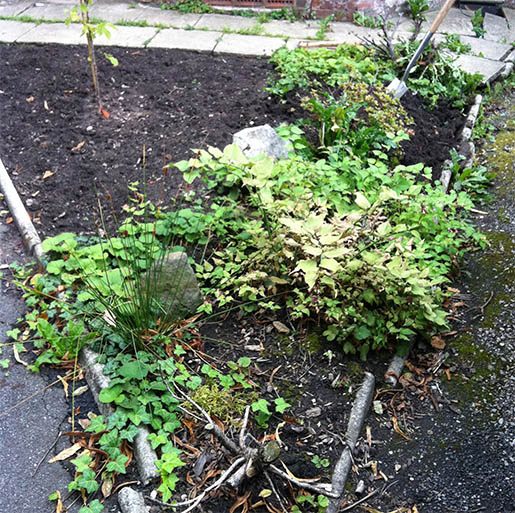
Outdoors
- Dig up plants on triangular bed in front garden
- Level soil in triangular bed (use wheelbarrow to relocate spare soil to pond in back garden)
- Plant grass seed in front garden
- Cut lavender back in front garden
- Continue cutting laurel in front garden
- Get trees cut back in back garden
- Continue cutting back shrubs in back garden
- Continue planting grass seed in back garden
- Fix dog run fence
- Plant tulip bulbs.
Did you make it this far without falling asleep? It's pretty dull stuff, huh.
But do you know what's really scary about this list? Apart from the thought of the appalling mess that will be caused by removing the plaster and lath ceiling in the cellar, that is?
It's the fact that by the time we've done everything on the list, the house won't really look any different. The stairs will look gorgeous, but we'll still have two other sets of stairs to do (one is currently untouched, and the third is in progress) and the surrounding hallway will still look dingy and unloved.
And we'll only have insulated one ceiling of one room in the cellar, leaving three other cellar rooms to do before we even get started on the one project I'm dying to crack on with - yep, the master bedroom. Or specifically, insulating the walls of the master bedroom because we'll need to do that before we can even think about making any cosmetic changes. The furniture projects will be fun to do though - I'm including them because sometimes you need a quick win that makes a nice change from being covered in 130 year old dust.
So that's what we'll be working on this autumn. We probably won't have many exciting big reveals to share (although I'm hoping the staircase before and after will be pretty spectacular) but this is the reality of DIY renovating a large Victorian property with kids. I hope you'll stick around and help to see us through!